- GET IN TOUCH WITH US -

7 days a week

t: 0845 689 689 9

ONLINE CONTACT FORM

sales@chimneylinings.co.uk

FuranFlex Chimney Lining


INSTALLATION OF THE FURANFLEX LINER

The installation of the FuranFlex liner tube in chimneys is fundamentally different from all other chimney lining procedures. Chimneys can be lined using FuranFlex within a few hours, instead of the several days using traditional methods. Using this procedure even chimneys that cannot be lined using any other procedure or can only be lined by demolishing the chimney wall can also be lined using this procedure. At the same time finished FuranFlex liner tubes are more durable and safer than the materials used for traditional chimney lining.

The FuranFlex procedure has one disadvantage, using this technology requires specialist skill and experience. Below we provide a quick insight into the steps of installing FuranFlex. Many different types of boiler and chimney exist so below we describe the simplest lining task in the case of a medium-sized, natural draft, distorted chimney.


KEY:

1. Steam Generator • 2. Watertank • 3. Fastblower • 4. Upper Head Holder • 5. FuranFlex • 6. T-Joint • 7. Calibrating Ring 8. Upper Adapter Head • 9. Lower Adapter Head • 10. Air Inlet Pipe • 11. Condense Water Return Pipe • 12. Steam Inlet Pipe • 13. & 14. Rope Clamper K1. Monitor K2. Camera

a. Preparing the chimney
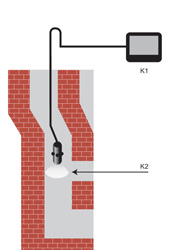
- Camera inspection
- Removal of foreign objects
- Cleaning, if necessary
- Filling up steam generator with water (distilled water if possible)
- Connecting steam generator to gas bottle
- Starting steam generator heating

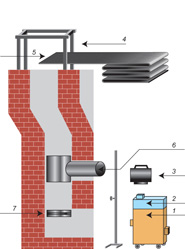
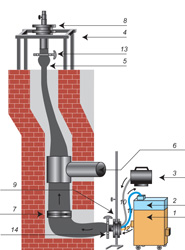
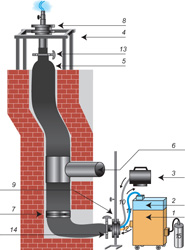
b. Setting up upper and lower frame

- Putting in T-joint
- Placing FuranFlex liner tube (5) near the
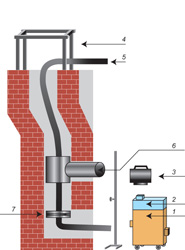
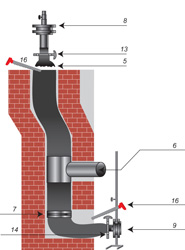
c. Pulling soft FuranFlex (5) liner tube into the chimney flue

In the case of smaller chimneys from the top towards the bottom, in the case of larger chimneys from the bottom towards the top with the help of a winch
- The liner tube goes through the T-joint (6) and the calibrating ring (7)
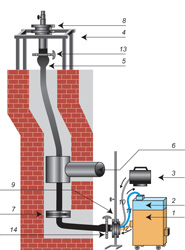
d. Placing upper and lower adapter heads (13-14) in the FuranFlex hose

- Fixing adapter heads to the frames - Connecting the pipe (10) of the fast blower (3)
- Connecting the pipe (12) of the steam generator (1)
- Connecting the condense water return pipe (11) to the water tank (2)

e. FuranFlex Inflating the FuranFlex hose with the jet blower

- Upper valve (8) closed
- Checking
f. FuranFlex hardening

- Setting required pressure on steam generator (0.1 - 0.3 bar, in the case of a larger diameter the pressure is lower)
- Starting steam injection
- Opening upper valve to a minimum extent
- Monitoring the hardening process. Increasing steam pressure when slight hardening occurs (maximum value: 0.4 bar)
- Cooling FuranFlex® (with jet blower if available)
g. Cutting off unnecessary tube length above upper adapter head

- Cutting off FuranFlex below calibrating ring (7)
h. Fitting cleaning element (17) to calibrating ring (7)

- Locking inspection door (18)
- Mounting rain shield (19)


Chimney Linings - Broadhead Road, Edgworth Bolton BL7 0JN © 2012 Chimney Linings. All rights reserved